Tuesday, May 3, 2011

PHP


PHP / Personal Home Page / PHP Hypertext Preprocessor

PHP is a scripting language originally designed for producing dynamic web pages. It has evolved to include a command line interface capability and can be used in standalone graphical applications.

You need to configure the FastCGI module and PHP to host PHP application on IIS 7.0 , I prefer FastCGI module and manually configuring it because when you search for help on the net , the easiest thing which I could grasp easily was this inbuilt service in Windows by Microsoft and this is more preferable than using a WAMP because , you will have lots of problems like searching for the default directory , setting permissions ,etc and believe me its not an easy task just googling for answers and applying it on your PC !!

Overview
--------------
CGI programs are executables launched by the web server for each request in order to process the request and generate dynamic responses that are sent back to the client. Because many of these frameworks do not support multi-threaded execution, CGI enables them to execute reliably on IIS by executing exactly one request per process.

FastCGI addresses the performance issues inherent in CGI by providing a mechanism to reuse a single process over and over again for many requests. Additionally, FastCGI maintains compatibility with non-thread-safe libraries by providing a pool of reusable processes and ensuring that each process will only handle one request at a time.

Windows Vista SP1 or Windows 7
--------------------------------------------

Add the CGI feature by going to Control Panel -> Programs and Features -> Turn Windows features on or off. Do as shown below :

Go to Internet Information Servises -> World Wide Web Services ->

Select : - Application Development Features ,
Common HTTP Features ,
Health and Diagnotics ,
Security.


Go to Internet Information Servises ->Web Management Tools ->

Select : IIS Management Console


Install and configure pHp
----------------------------------
It is recommended to use a non-thread safe build of PHP with IIS 7.0 FastCGI. A non-thread safe build of PHP provides significant performance gains over the standard build by not doing any thread-safety checks, which are not necessary, since FastCGI ensures a single threaded execution environment.
  • Unpack the files to a directory of your choice (e.g. C:\PHP).
  • Rename the "php.ini-recommended" in C:\PHP to "php.ini".
  • Set the Extension dir by uncommenting extension_dir and adding in front of it= "c:\php\ext" . Finally you get extension_dir = "c:\php\ext"


Uncomment :
extension=php_mssql.dll extension=php_mysql.dll


Add at the end :
fastcgi.impersonate = 1
cgi.fix_pathinfo=1
cgi.force_redirect
= 0.

  • To test if the PHP installation is successful, run the following from the command line prompt: C:\PHP>php –info

Configure IIS 7.0 to Handle PHP Requests
------------------------------------------------------
Go to Control Panel -> Administrator Tools -> Internet Information Services (IIS) Manager.

Open IIS Manager and then select and open “Handler Mappings” at the server level.


Select the “Add Module Mapping” action and specify the configurations settings as below:

  • Request path: *.php
  • Module: FastCgiModule
  • Executable: "C:\PHP\php-cgi.exe"
  • Name: PHP via FastCGI
Click OK. A dialog box appears asking if you want to create a FastCGI application for this executable. Click Yes.


Test that the handler mapping works correctly
--------------------------------------------------------------
Open Notepad

Write the code :

Save as "phpinfo.php" in C:\inetpub\wwwroot

Open a Browser , Give the url as "http://localhost/phpinfo.php"

If everything works fine you will get a table of information like :


Ya Hoo !!! The PHP server is set ..... GET ........ SET ......... COOOOOOOOODE !!!


How to install XAMPP

XAMPP is an easy-to-use multi-platform package that installs Apache, MySQL, PHP, phpMyAdmin, and a whole slew of other software useful for dynamic web development on your computer. Installation is painless, and configuration minimal. This page guides you through installing the package on both Windows and Mac OS X. You can also read general notes about using XAMPP.

Installing on Windows

1.               Go to http://sourceforge.net/project/showfiles.php?group_id=61776 and click "XAMPP Windows". If necessary, click the "1.7" link to expand the appropriate version, and choose to download xampp-win32-1.7.0-installer.exe.
                                                                          The XAMPP Control Panel in Windows
2.               Run the installer. If you want, you can choose to install the Apache and MySQL servers as services, which will make them start automatically every time you start Windows. If you don't choose this option, you will need to use the XAMPP Control Panel application to start the servers individually each time you need them. This may be desirable if you don't intend to use your servers that often.
3.               Upon completion of installation, the XAMPP Control Panel will open (if not, click Start » All Programs » Apache Friends » XAMPP » XAMPP Control Panel). This tool lets you start and stop the various servers installed as part of XAMPP.
4.               Start Apache and MySQL by clicking on the "Start" buttons next to each item. If prompted by Windows Firewall, click the button labelled "Unblock".
5.               Go to http://localhost/. If you are directed to a page with the XAMPP logo, your installation was successful. Congratulations!
You can add or change the files in C:\xampp\htdocs to change what you see at http://localhost/ on any local web browser. You may need to delete index.php in that directory to stop the server from automatically redirecting you to the XAMPP configuration interface.


Here are the locations of some configuration and log files you may want to view or change:
Type
Location
Apache configuration
C:\xampp\apache\conf\httpd.conf,C:\xampp\apache\conf\extra\*.conf
Apache logs
C:\xampp\apache\logs\access.log,C:\xampp\apache\logs\error.log
PHP configuration
C:\xampp\php\php.ini
MySQL configuration
C:\xampp\mysql\bin\my.cnf


Installing on Mac OS X


1.               Go to http://sourceforge.net/project/showfiles.php?group_id=61776. Choose "XAMPP Mac OS X".
The XAMPP Control Panel in Mac OS X
2.               Choose to download xampp-macosx-0.7.4.dmg.
3.               Double-click the Disk Image file you just downloaded.
4.               In the window that opens, double-click XAMPP for MacOS X.pkg.
5.               Once installation completes, go to your Applications folder, and go inside the xampp folder inside.
6.               Double-click on XAMPP Control Panel. This tool lets you start and stop the various servers installed as part of XAMPP.
7.               Start Apache and MySQL by clicking on the "Start" buttons next to each item. Note that you will need to repeat these steps if you reboot your computer and wish to use Apache and/or MySQL.
8.               Go to http://localhost/. If you are directed to a page with the XAMPP logo, your installation was successful. Congratulations!
You can add or change the files in /Applications/xampp/htdocs to change what you see at http://localhost/ on any local web browser.
Here are the locations of some configuration and log files you may want to view or change:
Type
Location
Apache configuration
/Applications/xampp/etc/httpd.conf,/Applications/xampp/etc/*.conf
Apache logs
/Applications/xampp/xamppfiles/logs/access_log,/Applications/xampp/xamppfiles/logs/error_log
PHP configuration
/Applications/xampp/etc/php.ini
MySQL configuration
/Applications/xampp/etc/my.cnf

Notes about XAMPP

Note that "localhost" (often resolving to the reserved IP address 127.0.0.1) is a special name defined in the DNS system as a name that a host uses to reference itself, using the loopback interface. URLs that refer to "http://localhost/" can only be used on the system with XAMPP installed. However, by default, XAMPP configures Apache to allow connections from outside your system, so people on your network, or in some cases users from anywhere in the world, may be able to access your Apache-served files using your IP address.
You can go to http://localhost/phpmyadmin/ to use the locally-installed copy of phpMyAdmin, a tool useful for manipulating your MySQL databases in a graphical environment.
On the Windows version of XAMPP, you can use the command-line interface (CLI) version of PHP at C:\xampp\php\php.exe. On Mac OS X this is located at /Applications/xampp/xamppfiles/bin/php. If you want to be able to execute PHP by simply typing "php" at the command line in either operating system, you need to add the directory containing PHP (C:\xampp\php on Windows and /Applications/xampp/xamppfiles/bin on Mac OS X) to your "path" variable. There are tutorials available for doing this on Windows and on Mac OS X.
If you want to fine-tune your Apache, MySQL, or PHP settings, you can go to http://localhost/xampp/ to view and change parts of your XAMPP configuration. If you are feeling especially adventurous, you can also hand-tweak the configuration files in the XAMPP installation directory.
Note that XAMPP may tell you that PHP is insecure because it is not running in "safe mode". However, PHP's safe mode feature is considered a broken security measure (and has been removed in the next version, PHP 6.0) and should not be enabled.

ASP Exersice 1

** Hihi everyone, today i will share with you about the ASP exercise by using the Dreamweaver CS3. before we start, the most important thing that u need to do in your desktop or laptop is install Internet Information Services (IIS) from the CD that you usually used for installing window after formatting


** After you installing the IIS from your services pack CD, then the Inetpub folder will appear in your C-drive. then inside the Inetpub folder you can create a folder named project and data because later you will need these 2 folder in filling your product.

Steps:

1.
First of all create a new site in Dreamweaver CS3 by follow the note given by lec. Save the new site in c:\inetpub\wwwroot\project.

2. Then, 2. open Microsoft Office Access and create a database in Access like the procedure in note and save the database in the folder c:\inetpub\wwwroot\data. The database MUST save in MS Access 2002-2003 with .mdb file extension.

3. After setup the database, save again the data.mdb file and close Access window.

4. Then, go to Adobe Dreamweaver CS3 and open a ASP page, we want setup the connection string. my connection string is Driver={Microsoft Access Driver (*.mdb)};DBQ="& Server.MapPath("/data/data.mdb"). Then, click test to connect to database. 5. Create a new ASP VBScrip page. Insert a form. Insert a table and insert the text and text field like given in the tutorial1 lecture note.
6. Save the page in project folder as as contact.
7. Close your contact.asp first then open back your contact.asp and then Click Server Behaviors tab. Click the + button, select RecordSet. Select the connection that you had created.
8. Create another new ASP VBScript file, save this file in project folder also. Save the name as view.asp. Then draw the table for name, username, password and remarks.
9. Activate Bindings tab. Click + button select RecordSet. Click at + button sign in front of the RecordSet and you can see all the fields in the database.

14. Drag nama into cell 1 in column 2 in the table that you create in contact.asp. Drag other fields also into the following cell in column 2. Draw a line below the table. Next highlight the table including the line below the table. Click the + button on the panel, select Repeat Region. Click ok.
15. follow the steps in instruction note then u will produce your own ASP database.


ASP


ASP INTRODUCTION
What is an ASP File?

File extension:
.asp
MIME type:
text/html
Type code:
TEXT
Uniform Type Identifier:
public.html
Developed by:
Microsoft
Type of format:
Technology
Extended to:
ASP.NET
Standard(s):
ASP 3.0


What Is ASP?
(Active Server Page) A Web server technology that allows for the creation of dynamic, interactive sessions with the user. An ASP is a Web page that contains HTML code and embedded programming code written in VBScript or Jscript. It was introduced with Version 3.0 of Microsoft's Internet Information Server . When Internet Information Server encounters an ASP page requested by the browser, it executes the embedded program. ASPs are Microsoft's alternative to CGI scripts and JavaServer Pages (JSPs), which allow Web pages to interact with databases and other programs. Third- party products add ASP capability to non-Microsoft Web servers. The Active Server Page technology is an ISAPI program and ASP documents use an .ASP extension.


Creating an ASP Document
Creating an ASP document is easy. To begin coding ASP you need only two things: a simple-text editor like notepad or Textpad or Editplus and the dedication to follow our tutorial! Notepad is the most basic of simple-text editors and you will probably code a fair amount of HTML with it.
When a browser requests an ASP file, IIS passes the request file to the ASP engine. The ASP engine reads the corresponding ASP file, line by line, and executes the scripts in the file. Finally, the ASP file is returned to the browser as plain HTML format.

ASP can connect to databases, dynamically format the page, execute statements, and much more. You may use VBScript, JavaScript, PerlScript, and PythonScript within Active Server Pages, with VBScript set as the default scripting language. We recommend that you use VBScript as this should do everything you need and is the most commonly used.
The appearance of an Active Server Page depends on what is viewing it. An Active Server Page looks just like a normal HTML page to the Web browser that receives it. If a visitor to your Web site views the source code of an Active Server Page, that's what they see: a normal HTML page. However, the file located in the server looks very different. You also see server-side scripts. This is what the Active Server Page looks like to the Web server before it is processed and sent in response to a request.

Frequently Asked Questions
» What is ASP?
Active Server Pages:
Active Server Pages (ASP) is a server side scripting language that lets a webmaster transform the plain, static web site into dynamic solution. With Microsoft's server side scripting language you can gather data from your site's visitors, use sessions, cookies, application variables, and more.
» Is ASP complete solution?
While ASP is useful, it is not a stand alone solution. Rather, ASP is a supplement to HTML (and CSS and even Javascript) and your final ASP code will often contain bits of pieces of code that are not ASP. If you had ever wanted to take orders, gather emails, or make a decent guestbook, ASP will provide you the necessary tools to complete these tasks.
» Does my computer have to run Windows? What about a Mac?
You allcan do your training on a non-Windows computer like Mac. But some of the examples in our advanced classes require a newer version of Windows, like Windows 98 or Windows 2000.
» What you need to know?
Before you start in on Academic ASP Tutorial, it is recommended that you have a some knowledge of HTML, as this tutorial will not explain the HTML code in any great depth. If your HTML knowledge could use a touchup, check out our HTML Tutorial or for the complete HTML Beginner: First Web Site Walkthrough. This ASP Tutorial is quite long, so do not try to take it on all at once. We find that reading a couple lessons at one sitting and then giving yourself time to reflect on what you learned really helps to understand the subject better. Good luck!
» After I have edited an ASP file, I cannot view the result in my browser. Why?
Make sure that you have saved the file with a proper name and extension like "C:\Inetpub\wwwroot\mypage.asp". Also make sure that you use the same file name when you open the file in your browser.It should be like localhost/mypage.asp


RUN AN ASP WEB PAGE
·         If you do not know where to save and run your ASP web pages from, this lesson will guide you .
·         In the previous lesson we learned how to installed Microsoft's Server software (IIS or PWS) to enable your computer to run .asp files.
·         However, having IIS or PWS installed is not enough to run ASP files. The next step you must complete is to save and run your ASP files from a special location on your hard drive: the Inetpub directory to be specific.

Follow these steps to navigate to this directory: 
1.      Open up "My Computer" or "Windows Explorer" so that you can view your system's files and          
directories.
       2. Select and Open the C drive (C:)
       3. Double click the Inetpub folder
       4. Double click the wwwroot folder - The full path to this location is "C:\Inetpub\wwwroot"     
           for  you   advanced users
      5. Within the wwwroot directory locate the "localstart.asp" file.


How To Create A Contact Form In Dreamweaver CS3 Using ASP

Setup a site
As with many functions in Dreamweaver, there are two ways to access the site functions, either from the Site menu on the main menu bar or the Files panel, site dropdown.


This will open up the Site Definition interface, which looks like:
The two important bits of information to enter on this panel include the site name and the site HTTP Address (URL). We will enter "Database Packs" for the site name and the full URL for the HTTP Address, http://www.databasepack.com.


Click the Next > button and the server-side technologies panel will load. It looks like:
We want to click on the second radio button (to indicate we want a server technology), like so:
On the Which server technology? dropdown, we want to select the option, ASP VBScript.Then we want to click the Next > button again.
Note: Selecting "No, I do not want to use a server technology" changes the next page as well. The difference for your site is the file extension Dreamweaver makes new pages with is .htm (or .html depending on your setup) instead of .php, .asp or .cfm and the server behaviors and database features of Dreamweaver won't be enabled.

Our next option is on how to work with the files during development. This will determine how previews work and if you have a staging/test server or just a production server. If you have a server setup on your local machine, you can select the first option. If you have a server set up on a direct network connection (in your office, for example, you could open up the folder to the root directory of the web site using your network connections). In most cases, you will edit them locally and then upload them to a remote server, which is the default option selected when the panel loads. The only thing we want to change is where the files are stored on your local machine - click the folder icon and navigate (or create) the folder where you would like the files stored. Click the Next > button when done.
Now you should have following panel to work with:
Select the FTP option in the How do you connect to your testing server? option.
This changes the panel to include the form fields for the FTP connection and it looks like the below now:
The entries for the FTP include the FTP address, folder the files are stored in and the FTP login and password. The FTP address in most cases could be the domain name - check with your hosting company if they have a special FTP address for you to use or check your control panel for the FTP setup. FTP addresses, for example, could be ftp.databaseback.com instead of the www.databasepack.com. On a lot of Linux/GNU servers, the web site root folder is the public_html folder. Your server may have a different folder name or no folder name. Lastly, the FTP login and password settings need to be entered, these are from your hosting company. If you do not share your PC with anyone, click the Save checkbox. If you do share your PC with someone and you don't want them to have the ability to FTP to this web site, uncheck the Save button. Once you've got the FTP set up, click on the Test Connection button to make sure everything works. Click the Next > button to continue.
Finishing up the testing files settings, Dreamweaver needs to set up the URL root folder for your site. The following panel will load up for us to make the needed changes:
It will append the domain web address with the folder from the prior panels and, in our case, gives us http://www.databasepack.com/public_html/ . Since the server puts up at the folder below where the server stores the web site, we need to use the public_html folder to get Dreamweaver to be in sync with the web server files. Here, we need to correct the folder name by removing it, so Dreamweaver will know that the index.php in our local root folder is the index.php home page for the site. Simply put, just remove the public_html/ from the entry. 

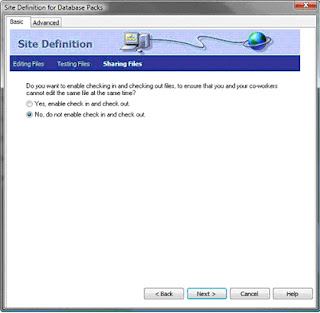
Setting up the Check-in/out and sharing files options - the next panel has the options set for this.
If you do not need to share files, just click the Next > button. Otherwise, change the option to Yes, enable check in and check out. Then the panel will change to include the options for the check in and out. I would leave the second option as is, when you get a file from the server, you should check it out. The two textfields are for your name and email address. This is so others who need to check out a file you have checked out know who you are and have a way to get in touch (on the off chance you forgot about the file and didn't check it back in or an emergency edit needs to occur and they want to let you know that the file will be changed, etc). When done, click the Next > button.
Finally! We are at the summary of the site setup. Quickly review the information and determine if anything needs to be changed and, if so, use the < Back button to go back to the panel that would need to be changed. Once you are satisfied, click on the Done button.
Conclusion
Once you have set up the site, you can find it in the Files panel, as shown in Image 22. With sites you are able to have Dreamweaver's site functionality and features work for you—paths are easier to deal with (no more file://|// type stuff in your image names) and you can make your server-side technologies work! Happy site building!


Creating the Guestbook Database

To create a database your first need to open Microsoft Access and choose 'Blank Access Database' from the starting menu. You will be prompted for a name for the database and where you want it saved. Call the database 'guestbook.mdb' and save it in the same directory as the web page connecting to the database is going to be.

You should now see the main Access dialog box, from here select '
Create table in design view'.


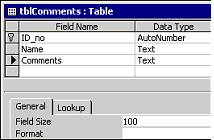
You now need to create 3 fields for the database and select their data types.

Field 1 needs to be called '
ID_no' and have the data type of 'AutoNumber'. Also set this field as the primary key.

Field 2 needs to be called '
Name' and have the data type of text.

Field 3 needs to be called '
Comments' and also has the data type of text, but this time you need to change the default field size of 50 to 100 characters under the 'General' tab in the 'Field Properties' box at the bottom of the screen.


Once all the field's have been created and the data types and primary key set, save the table as 'tblComments'.

Now the table has been created you need to enter some test data into the table. You can do this by double-clicking on the new table (tblComments) in the main dialog box. From here you can enter some test data. I would recommend entering at least 3 pieces of test data.

Setup the Contact Form
Create a New Page in Dreamweaver. File > New > Blank Page > HTML > Create. Insert a Form. So From the Insert Menu Select Form.

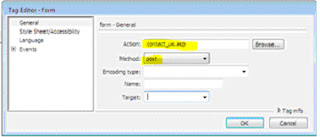
From the Form Dialog Box that pops up give the Form an action of contact_us.asp (this will be the name of the page that we send this info to to process it and send you an email). Also change the Method to Post.

Now Using a combination of Labels and Text Boxes and a Text Area Layout the Form the way you would like it. In this example I have placed the Labels directly above the Input Boxes for useability purposes. I have also used a field set to group the elements together. If you need to know more about styling web forms with CSS then read this article.
Now when you are placing the Text Boxes and the Text Area on the page make sure that you give them the following names:
FirstName, Surname, Email, Website, Message. This is very very important as the ASP Script that I will be using will require these names.
To make it really simple. The text box that you are using for the users first name give it a name FirstName etc etc. You get the drift. In this Article I am not going to go into to much detail about using css to style the form and its elements you can check out how do do that here. You can see my simple form below.


Now that we have a simple Contact Form set up let’s move onto to the important stuff, the ASP Page that will handle the form processing.